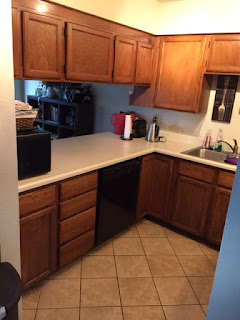
This summer, one of Tony and I's goals was to repaint our cabinets. We were SO pleased with the way that it turned out and even more pleased with the price as it was so much less expensive to paint than to replace the cabinets.
Below is the picture of our BEFORE kitchen, when we first bought our house.
If you are thinking of doing this, here are some tips as to how we did it and what worked. It took us about a week as we took it slow and worked really hard over one weekend. It could be done in about two to three days though!
The first thing we did was to take down the cabinet doors. We kept the hardware labeled in plastic baggies sitting in the cabinets so we wouldn't lose which hardware went with what door.
The next step was to clean the cabinets. We used this Krud Kutter, recommended by Lowe's and it worked really well! It was pretty disgusting to see what came off of the cabinets. You don't realize what can build up there with food particles, dust, etc. We just sprayed with paper towels and wiped, especially in the crevices. We had to use a razor to really scrap some of the crevices.
Next, we did one coat of primer on the doors and "boxes" (cabinet base). We had to let this dry. We also made holders for the doors by drilling nails into pieces of wood for the cabinets to dry on so they weren't just sitting directly on the ground.
We picked the color light gray and really liked how it turned out. After the primer dried, we did our first coat and really got into the nooks and crannies. We used special cabinet and wall paint rollers that you can buy at Lowe's. We did a second coat a little lighter, making sure it looked all even. We only did two coats and liked the color but some websites suggested three. It takes about four hours or so to dry between coats. The biggest pain was waiting on it to dry and also you don't realize how much surface area the back and front of the cabinets have. We also painted under the cabinets and the boxes twice and had to wait on those to dry.
But, the final product was SO worth it. This was our first big home project to do together and it was pretty fun. Below is a picture of the difference so you can see it pretty clearly.
And the final product!! I love the way it turned out and completely lightened up our small kitchen. We also replaced our original countertops which were a cream colored solid surface with a black granite. We did that back in October.
Our next goals are to add some hardware like cabinet and drawer pulls and a possible backsplash. I think putting your money into the kitchen area is so worth it! Our project probably cost about $100 dollars, $50 for the paint and $50 for other supplies like tarps, brushes, primer, etc. Amazing price and so much better than new cabinets. I did read though that you need to evaluate if it is worth it to paint your cabinets, if the wood is really old and cracking and chipping, it could be time just to replace. Ours was not there yet so I think the painting was good.
Good luck to all the Do It Yourselfers out there!!
Here is a picture of my mom in my new kitchen when she came to visit in July and she is making me some stew in the crockpot! Don't you just feel like you want to cook more in an updated kitchen?? This feeling lasted a week for me and than back to my old ways ;) ;)
Pin It


